No edit summary |
No edit summary |
||
| Line 1: | Line 1: | ||
| − | [[File:Desertmine.png|250px| |
+ | [[File:Desertmine.png|250px|right]] The '''Desert Airmine''' is a stage in [[Battle Bears Gold]]. It was released in the initial [[Updates#BBR1.0|1.0 ]] release together with the [[No Bear's Land]], [[Space Oddity]] and [[H.I.P. Test Lab]], but was later removed in update 2.0 together with [[Haunted Castle]] not only because they were the least popular maps, but to also allow more server space. It was re-released in v2.7. |
==Stage details== |
==Stage details== |
||
Latest revision as of 11:49, 9 August 2014
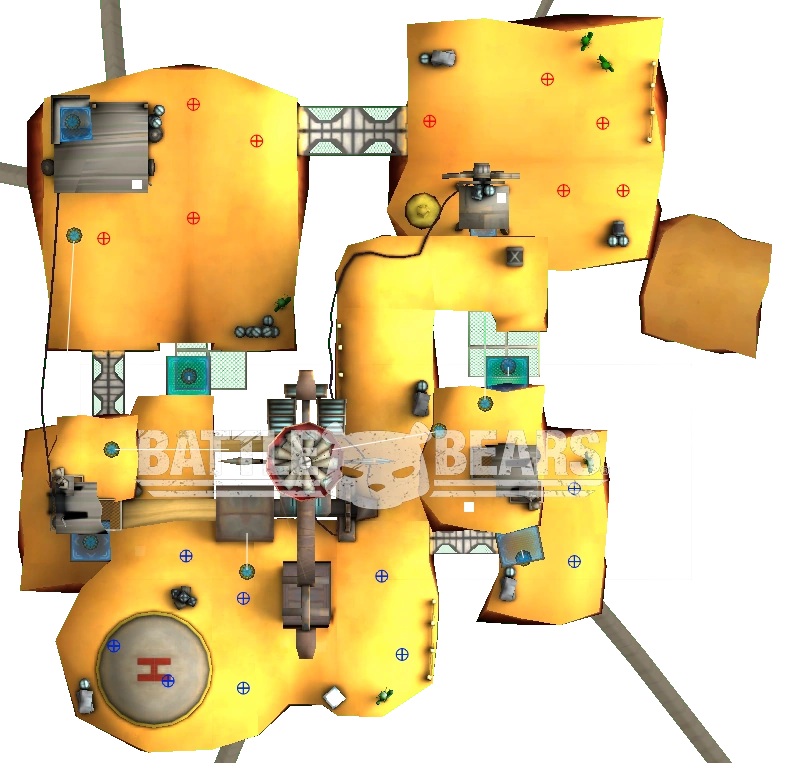
The Desert Airmine is a stage in Battle Bears Gold. It was released in the initial 1.0 release together with the No Bear's Land, Space Oddity and H.I.P. Test Lab, but was later removed in update 2.0 together with Haunted Castle not only because they were the least popular maps, but to also allow more server space. It was re-released in v2.7.
Stage details[]
The Desert Airmine was the very first asymmetrical stage in the game. It is built in three general levels, all split up on various smaller and bigger floating islands.
The stage itself is a massive-looking mine, featuring a large oil drill in the very center of the map, which constantly alternates in going up and down.
On the bottom level, three large islands are positioned, which makes for the Red Team's base. On the first island is the spawn points for all red teams players as well as a small hut which also holds a small Jump Pad. On the second island, a cactus is placed. This island also contains a jump pad which allows for access to the second level. The third and final island is positioned beneath the second level. Another Jump Pad allows for direct access to the above level.
The second floor is the biggest floor and contains one big, though weirdly shaped island as well as a smaller island, accessible by a bridge. The biggest part of this island also works as the spawn point for the blue team, most recognizable by the big helicopter landing pad. From this floor, players can access all levels of the stage either through a free fall or by using Jump Pads (for higher places).
The third level consists of 2 smaller islands only connected by a very long jump using a Jump Pad which involves crossing the oil drill. If the player hits the oil drill in mid-air, it will count as a suicide. To safely cross this, the player must use the Jump Pads while the drill is down. The first island is plain only allowing for access to the second island. This second island, however, also allows access to a small windmill with a small platform from which players can shoot from. This place is often used by Snipers since it allows overview of almost the entire stage. However, Snipers standing on the windmill should be wary of ambushes. Hitting the windmill itself will kill any player, counting it as a suicide.
Lastly, there is a fourth hidden island, accessible from the second level. When the oil drill is up, players can access a small hole in the floor, giving them access to a small island. Here, the Bearscream Sandwich pickup can be found. A small Jump Pad allows for access back to the stage itself, though if an Engineer has placed a mine on here and you have no explosive weapons, it could trap you here.
The Demo is can be used efficiently here if you use his missiles correctly (mainly Happy Hour). If you stand under certain islands, you can blast the Happy Hour onto the bottom of the island from below and get kills. Sixth Sense Goggles are extremely recommended here though.
The Engineer also can be used efficiently on this stage due to the abundance of Jump Pads, which are crucial to moving in between the different islands. This will allow for various place for the Engineer to place his Proximity Mines. This advantage is increased if the player is on the Blue Team, as he has the advantage of higher ground where he can use his mines. Placing a mine on the Jump Pad at the bottom island below the oil drill is also very effective as it is the only exit from that island.
SW boots and Jump are great tools in Desert Airmine, since the map has several small gaps in between the islands that can be jumped over given that the player has enough speed.
Desert Airmine[]

Desert Airmine
Desert Airmine is the second asymmetrical stage in Battle Bears Gold. Taking place in desert-like surroundings, the teams will use several Jump Pads to get around the field which also consists of many small shortcuts (such as a plank across the big gaping canyon).
The Desert Airmine is, as mentioned, non-symmetrical, which also includes the height. The stage contain several levels of floating desert islands, which varies in size.
As for spawn-points, these are also quite non-typical compared to the other stages. The Red team will spawn on the lowest level of the stage, while the Blue team will spawn in a somewhat middle level. These points are very close to each other, only separated by a Jump Pad and a high level-difference.


Desert Airmine 3D view
Another important place on this map is the windmill. This mill, also known to many as "the tower", has a platform from which a player standing there will have overview on almost everywhere on the course. The Blue team even has the ability to watch the entire Red team's base from the windmill platform.
On the Blue Team's base, there is a small hole. If you fall in that particular hole, do not worry. At the bottom, there is a platform with a Bearscream Sandwich. The jump pad there will launch you up and to the Red Team's base.
The Desert Airmine was removed in v2.0 but later returned in v.2.7.
Pickups[]
The Pickups in Desert Airmine can be located at the following positions:
- Bearscream Sandwich: Located on the fourth hidden island, accessible from the second level of the stage when the oil drill is up. This is behind the jump pad
- Imperial Basket Grande: Located on the windmill platform, accessible from the third level of the stage.
- Health Pack: Located on the second level on a small plank crossing the wide-open gap of the stage.
- Shield: There are 2 shields in the Airmine. The one will appear on the third island on the bottom level. The other is located on the second floor, accessible by a tiny Jump Pad on a small container.
Plant the Bomb[]
In Plant the Bomb mode, the stage will be additionally featured with two bomb tubes and two bomb stands. The red bomb is located on the second level beneath the windmill, while the blue bomb is positioned on the third level, close to the windmill Jump Pad.
3D Images[]
The Bomb Inserters are located at each enemy team spawn point.
")
")
")
")
Trivia[]
- The Desert Airmine was the first clue of the addition of Graham, or the Engineer, who was later added in update 1.4. Graham's face is drawn onto the oil drill's sides, which also suggests that Graham himself built this course, due to the presence of a small toilet and three tool sheds.
- Upon the arrival of Update BBR Version 1.4.3, the movement of the drill was made much more erratic than the simple up-and-down movement before, making it much harder to time jumps over the drill.
- The Desert Airmine was the first asymmetrical stage in Battle Bears Gold.
- This stage was dreaded due to the many places to commit suicide. Falling off the stage or hitting the drill is very likely to happen on this particular map and will count as a suicide.